Sound Trajectory 4 — User Manual
3D sound spatializer and trajectory sequencer. This manual covers the whole application: getting started, every panel, the workflows (import → spatialize → automate → export), the shortcuts, troubleshooting and the FAQ.
Contents
- Getting started
- Interface overview
- Tracks & importing sounds
- The 3D scene
- Trajectories
- Speakers & calibration
- The listener
- Acoustics: distance, Doppler, reverberation
- Mixing desk, groups & effects
- Sequencer: clips & editing
- Automation
- Sampler
- Modulators & the node editor
- Exports
- Scripts
- iPhone / iPad controller
- OSC & MIDI
- Snapshots, markers & cues
- Preferences
- Sharing & collaboration
- Keyboard shortcuts
- Troubleshooting
- FAQ
1. Getting started
Sound Trajectory 4 places sound sources (audio tracks, mono or multichannel) in a 3D space, draws trajectories for them, and computes in real time the levels to send to every loudspeaker of any setup — a ring, a dome, a multichannel room — or a binaural fold-down for headphones. A DAW-style timeline edits the clips and automates the movements.
First launch
- Open the application. The start screen offers: a new project from a speaker configuration (stereo, 5.1, 7.1.4, domes…), your recent sessions, session import, the guided tour and this manual.
- Pick a configuration (on headphones, pick any: the Binaural output simulates the whole setup). You are now in the application.
- Import a sound: drag an audio file (WAV, AIFF, MP3, FLAC…) onto a track in the track bin (left column) — or several files at once (see §3).
- Draw a trajectory: open the Traj. tab on the right, then double-click in the 3D scene to place points. The source will follow this path.
- Start playback (space bar). In the timeline's Automations mode, draw the position-on-trajectory curve: it animates the source over time.
- Listen: on headphones, keep Binaural; on real speakers, switch the output mode to « Direct Enceintes » (direct to speakers) and select your audio interface (Preferences).
The concepts, one sentence each
- Track / Source — a sound object, mono or multichannel, positioned in space.
- Speakers — the loudspeakers of the setup, laid out in 3D (1 to 64).
- Listener — the listening point; the whole mix is computed relative to it.
- Trajectory — the 3D path a source follows (points, straight lines or a spline).
- Automation — a curve that drives a parameter over time (position on trajectory, volume…). It can belong to the track or to a clip.
- Snapshot — a complete capture of the spatial state, recalled with one click or via OSC.
- Coordinates — normalized −1…+1 space on each axis: +X right, +Y front, +Z up.
2. Interface overview
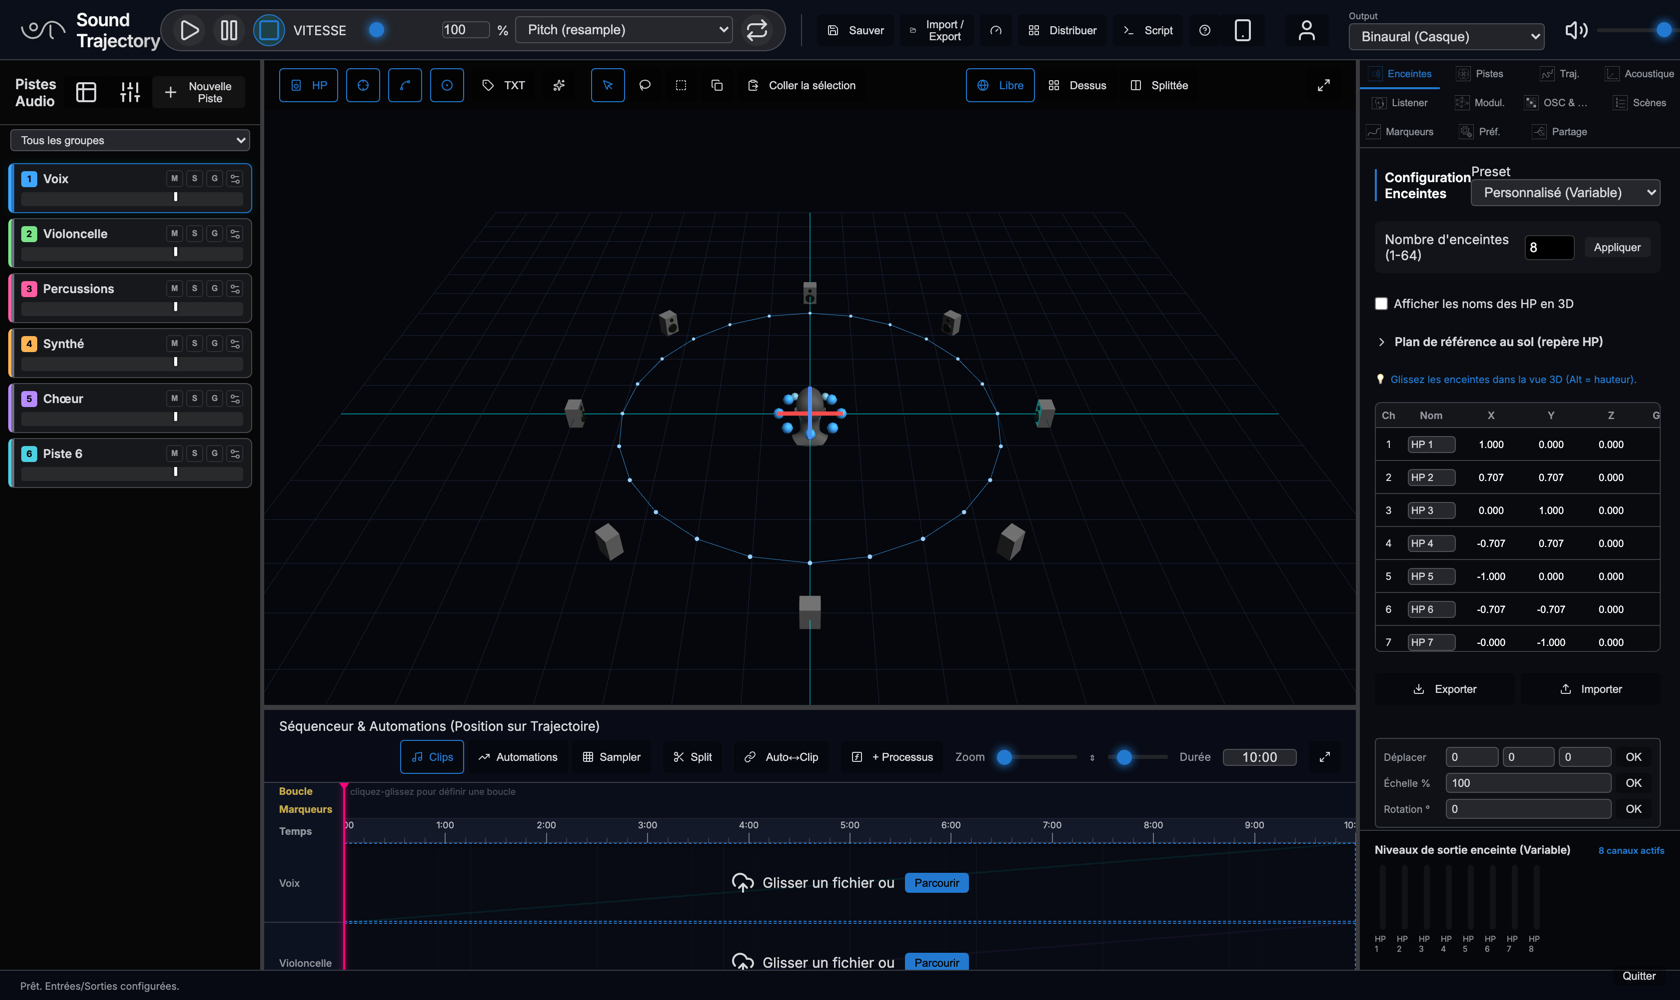
| Area | Contents |
|---|---|
| Top bar | Transport (play, speed, loop), session & files (Save, Import/Export, ADM, Video), Scripts, "?" help, iPhone controller, account/sharing, output mode (Direct/Binaural), master volume, DSP load. |
| Left column | The track bin: add, select, mute/solo, volume with built-in level meter, filter by group, track manager, mixing desk. |
| Center — top | The 3D scene: sources, speakers, listener, trajectories, editing tools, inPlace visualization. |
| Center — bottom | The timeline: three modes — Clips (editing), Automations (curves), Sampler (16 pads). |
| Right column | The settings tabs: Speakers, Tracks, Trajectory, Acoustics, Listener, Modulators, OSC & MIDI, Snapshots, Markers, Preferences, Share web — and, at the bottom, per-speaker output meters. |
The areas resize with their handles (between bin and center, between 3D scene and timeline, between center and right panel). The ⤢ buttons of the 3D scene and the timeline switch them to full screen; Esc always restores the layout.
The transport bar
- Play / Pause / Stop — the space bar starts or stops playback.
- Speed (5–400 %) — two methods to choose from: Pitch (resample), which shifts the pitch along with the speed (like a sped-up tape), or Timestretch (preserve pitch), which keeps the pitch intact (quality adjustable in the Preferences).
- Loop — loops playback over the project; the zone loop (Markers tab) takes priority.
Output and volume
- Output mode — « Direct Enceintes »: one physical channel per speaker, to the audio interface; « Binaural (Casque) »: the whole setup is simulated on headphones, on 2 channels.
- Volume — the master level.
- DSP Load — the audio engine load. If it saturates, raise the latency or enable automatic audio adaptation (Preferences).
3. Tracks & importing sounds
The track bin
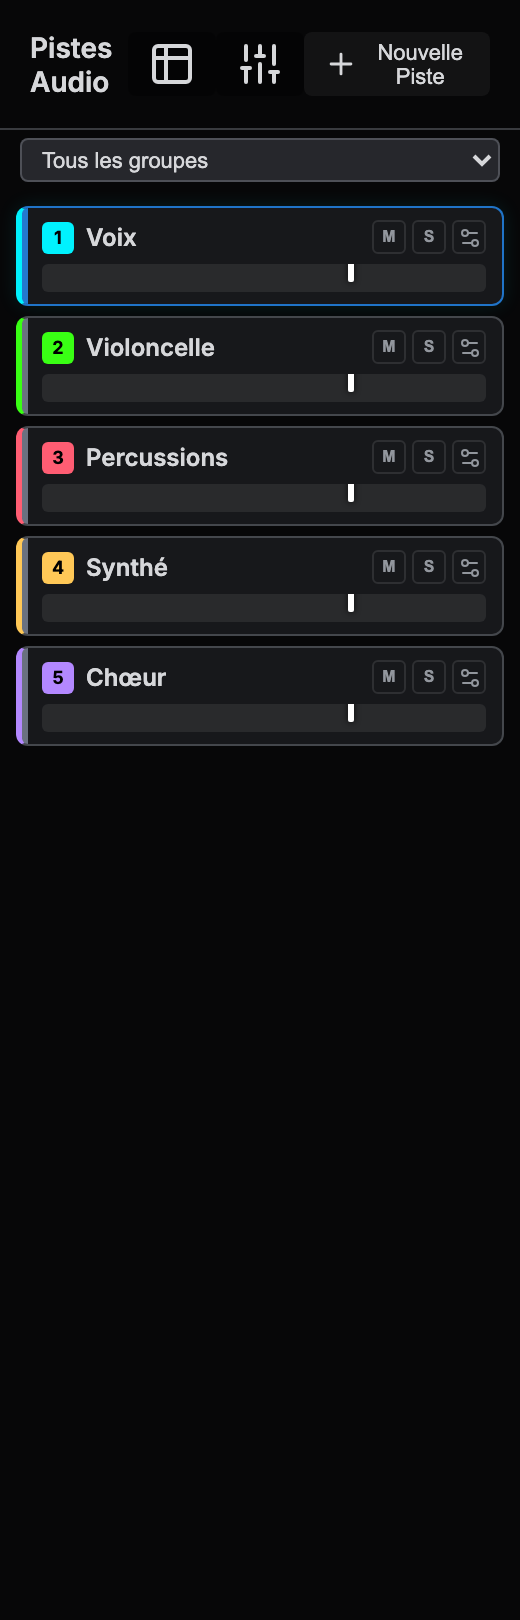
- Row 1 — the number badge (track color: click = palette, drag = reorder), the name, M (mute), S (solo), and the Setup button (gear) which opens the track configuration.
- Row 2 — the volume, with the level meter right inside the slider groove.
The menu at the top filters by mix group. « + Nouvelle Piste » (new track) creates an empty track. If no source exists yet, the Tracks tab offers three entry points: import a sound, use the microphone input (live), or create an empty track.
Importing several files at once
Drag and drop several audio files onto the bin or the timeline (or select several in the import dialog). A distribution choice appears — always without overwriting an occupied track:
- ⬇️ Défilé (cascade) — one track per file, going down from the active track; tracks are created as needed.
- 🔁 Rotation — cyclic distribution over the available tracks (wraps around; subsequent clips are placed further along in time).
- 🎲 Aléatoire (random) — each file lands on a random available track.
The track Setup
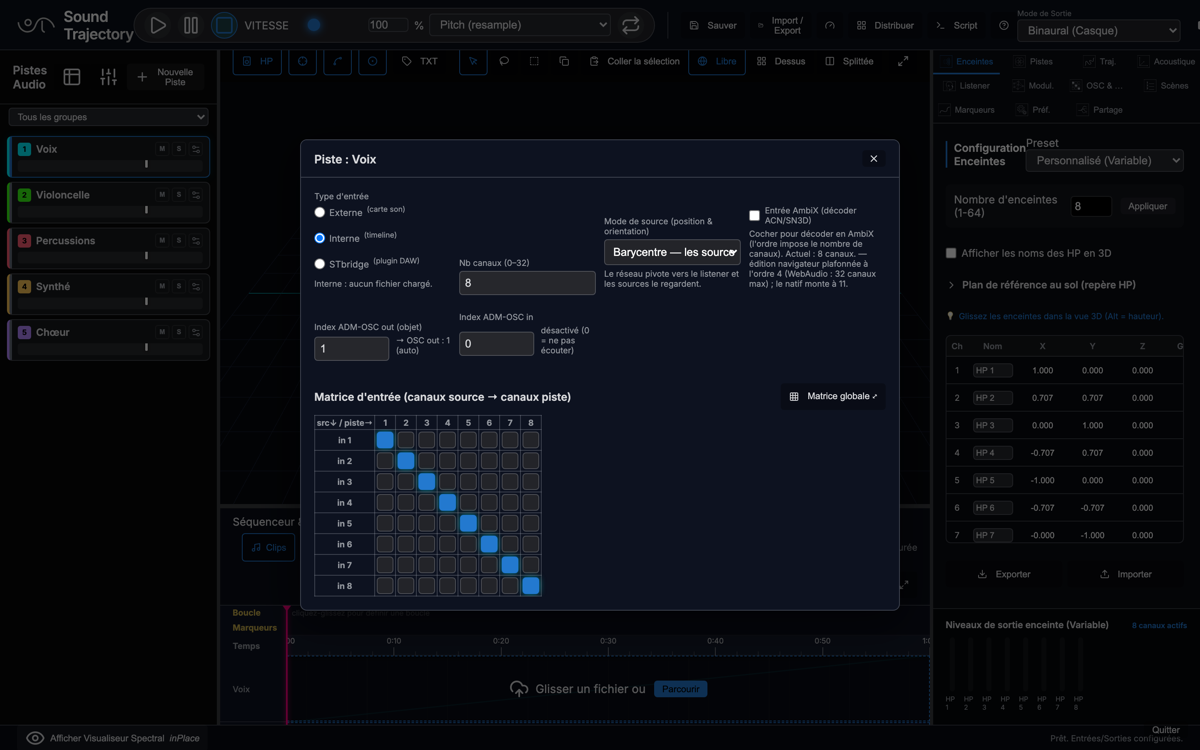
- Input type — Interne (internal: the timeline, clips and files), Externe (external: live capture from the audio interface, with optional monitoring while stopped), STbridge desktop (real-time feed from the STtracks plug-in inserted in your DAW).
- Channel count — sets the columns of the matrix (up to 144 on desktop, 32 in the browser).
- Source mode — how the channels are laid out and oriented: Normal, Barycentre (the array faces the listener), along the trajectory (the channels string out along the path, facing the direction of travel), along + facing the listener.
- Spread — widens the angular spread of the source (0 % = point source). Automatable,
and controllable over ADM-OSC (
/adm/obj/n/w). - ADM-OSC index — Output: the object index under which the track sends its position; Input: the index it listens to (> 0: the position comes from the external console and the trajectory is ignored; 0 = don't listen).
- AmbiX decoding — treats the channels as ambisonic components (ACN/SN3D) and decodes them to the speaker setup (the order follows the channel count: 4 → order 1, 9 → 2, 16 → 3… up to order 11 on desktop, 4 in the browser).
- Input matrix — the patch from source channels to track channels (identity by default).
Track manager & global matrix
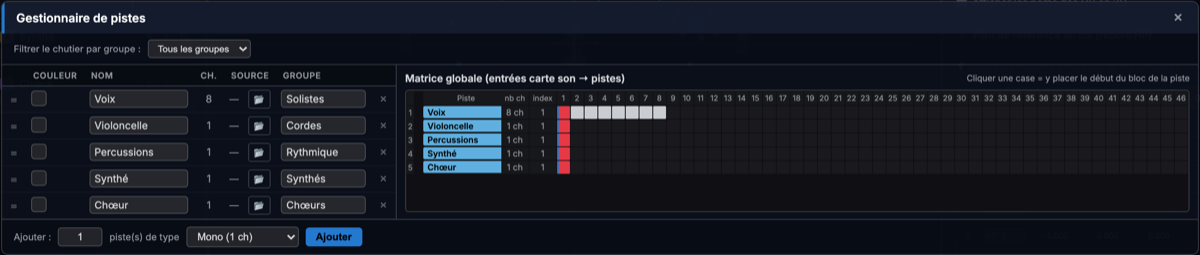
The manager (table button in the bin) edits tracks in bulk: color, name, channels, group, reordering, batch creation, deletion. The right 2/3 shows the global matrix: rows = tracks, columns = physical inputs of the audio interface. A track occupies a contiguous block; clicking a cell moves the start of the block there; two overlapping blocks show in red (conflict). The « ⇥ Aligner linéairement » button (align linearly) realigns all tracks over the available inputs, with no overlap.
4. The 3D scene
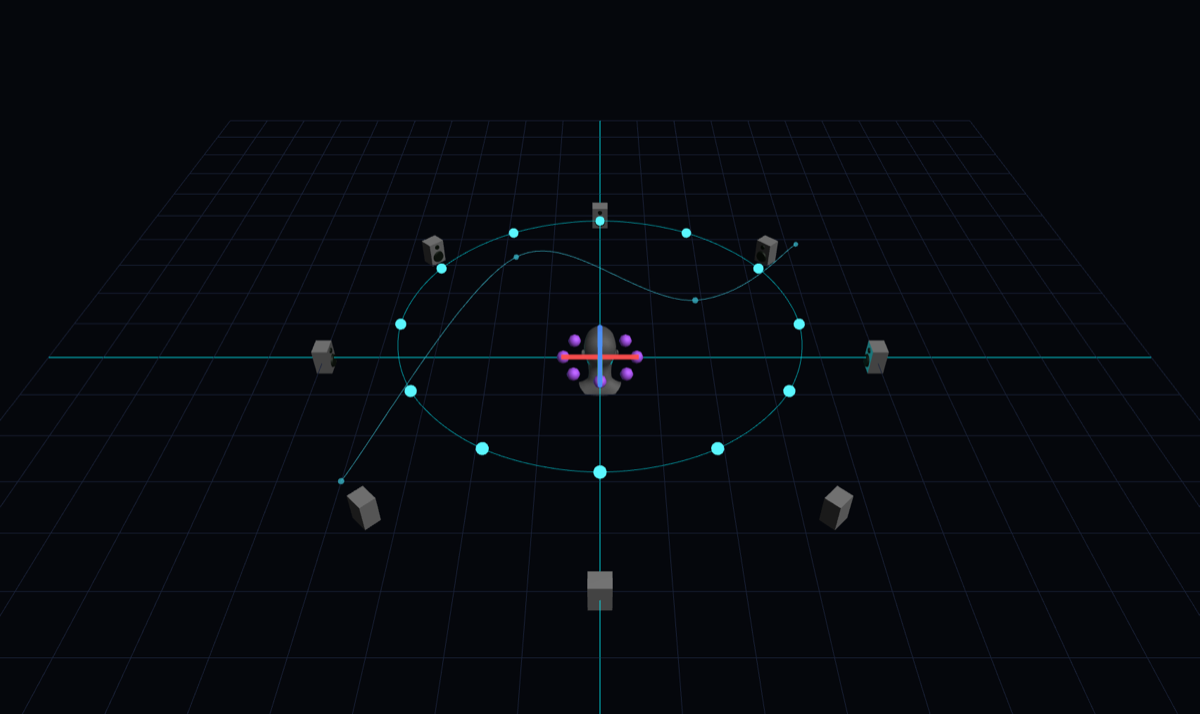
The scene shows the speaker setup, the sources and their trajectories in the normalized space. This is where you draw trajectories and move speakers and listener with the mouse.
The toolbar
- HP · grid · trajectories · sources · TXT — show/hide each family of elements and the 3D name labels.
- ✨ inPlace visualization — real-time spectro-spatial analysis, drawn inside the scene. Two stackable layers: Particules (a spectro-spatial cloud: each grain carries a frequency band at its position in space) and Polaire (directional lobes per band around the listener). Size, intensity, scale and opacity are set in the Preferences.
- Tools — navigate (orbit), lasso (select trajectory points), cage (rescale the trajectory with a 2/3/4³ grid), and copy / paste the selection (from one track to another, Ctrl/Cmd+C).
- Views — Free (3D orbit), Top (2D plan), Split (top + front). The Listener tab adds the first-person view.
- ⤢ Full screen — the scene takes the whole window; Esc to come back.
Gestures in the scene
| Gesture | Effect |
|---|---|
| Click-drag (background) | Orbit around the scene (Free view); wheel = zoom. |
| Double-click | Add a trajectory point (active track). |
| Shift + click on a point | Delete that point. |
| Drag a point / a speaker / the listener | Move it in the horizontal plane. |
| Alt while dragging | Set the height (Z) instead of the plane. |
5. Trajectories
A trajectory is an ordered list of points in space. The source's position is its
progress (0 → 100 %) along the path — animated by automation, a modulator, or an external
controller (/n/index over OSC).
- Preset trajectories — circles, spirals, generated shapes for the active track.
- Your presets — name and save the current path, reload it on any track, delete it.
- Point table — X/Y/Z editable by typing or by vertical drag; + (add at the 3D cursor), −, insert, reverse, delete (the whole trajectory), JSON import/export.
- Spline mode — the path becomes a smooth curve passing through every point (otherwise straight segments). Close the loop joins the last point to the first.
- Transforms — Move (X/Y/Z), Scale (%), Rotation (° around the center, Z axis). They apply in real time, non-destructively; the points are only rewritten when you confirm with OK.
- Lasso & cage — lasso-select points in the scene, rescale them in the gridded cage, copy/paste the selection onto another track.
6. Speakers & calibration
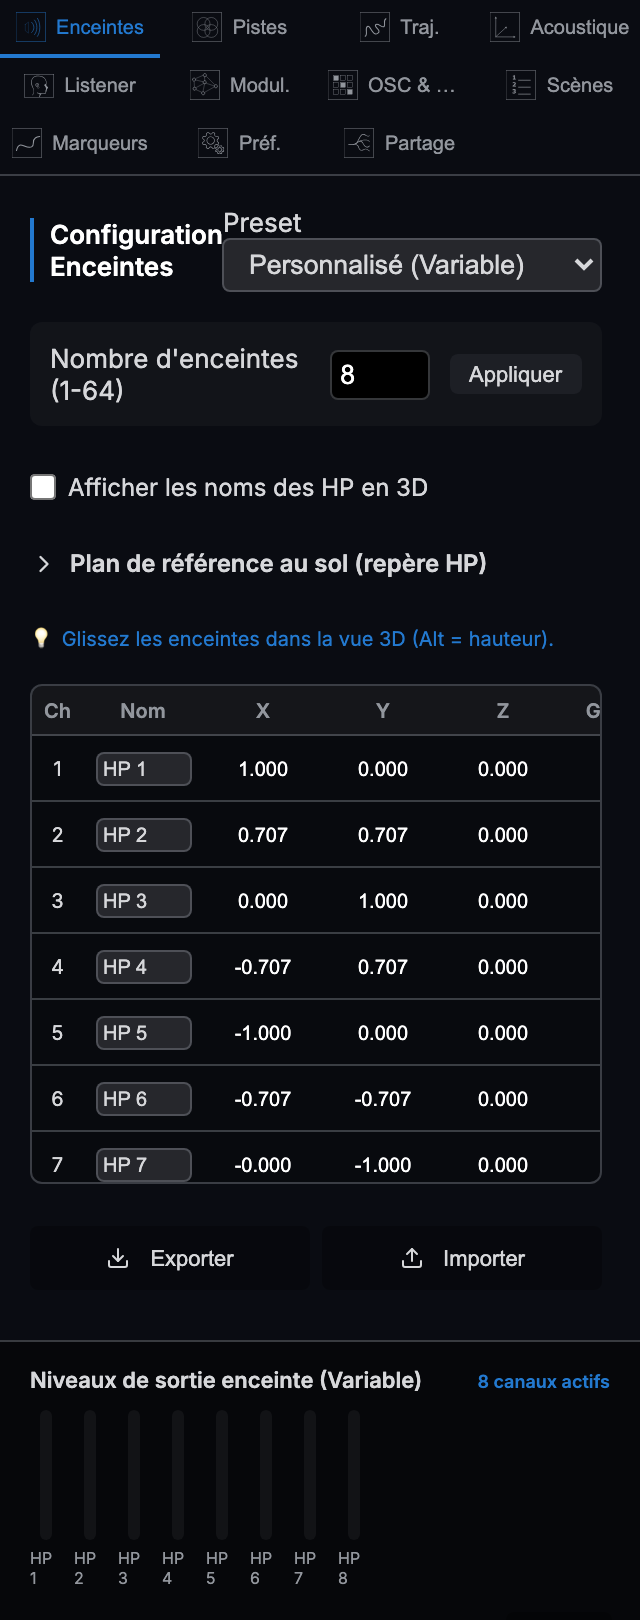
- Presets — stereo, quad, octophony, 5.1, 7.1, 7.1.2, 7.1.4, 9.1.6 (Atmos), geodesic domes 16/24/32, or custom (1 to 64 speakers: set the speaker count field + Apply for a ring layout).
- Coordinate table — name, X/Y/Z, and per-speaker corrections: gain (dB), delay (ms) and EQ (band curve, click to edit).
- Mouse editing — with the Speakers tab active, drag the speakers in the scene (Alt = height).
- Floor reference plan — import an image (a plan of the room) laid on the floor of the scene, with opacity, rotation and scale: handy for placing the speakers as they are in the real room.
- Import / Export — the speaker configuration saves to a reusable JSON file.
Acoustic calibration
Three correction modes (« Mode de correction » menu):
- Off / Direct — no correction.
- Compute — delays and gains computed from the geometry (distances), no microphone needed: « Calcul auto (géométrie) » button.
- Analyse — measured values: place a microphone at the listening point, select it (and its input channel), then run a sweep or pink noise: delay, gain and EQ of each speaker are measured and applied. The EQ curves remain hand-editable.
7. The listener (listening point)
The whole mix is computed relative to the listener: moving it re-spatializes everything.
- Fixed — at the center (default).
- Mobile — drag it in the 3D scene (or drive it over OSC:
/listener/position/xyz). - On a track's trajectory — the listener rides the path of a track, at a position set
with a slider (or
/listener/index0–100). The Anticipation setting decides which point ahead it looks at — like a camera mounted on a roller coaster.
First-person view: the camera moves to the listening point and follows the trajectory looking forward (POV). The roll in turns option tilts the head through curves (unchecked = tripod, the head stays level). Center puts the listener back in the middle.
8. Acoustics: distance, Doppler, reverberation
Spatialization model
Three ways of spreading a source over the speakers — when in doubt, keep the first one:
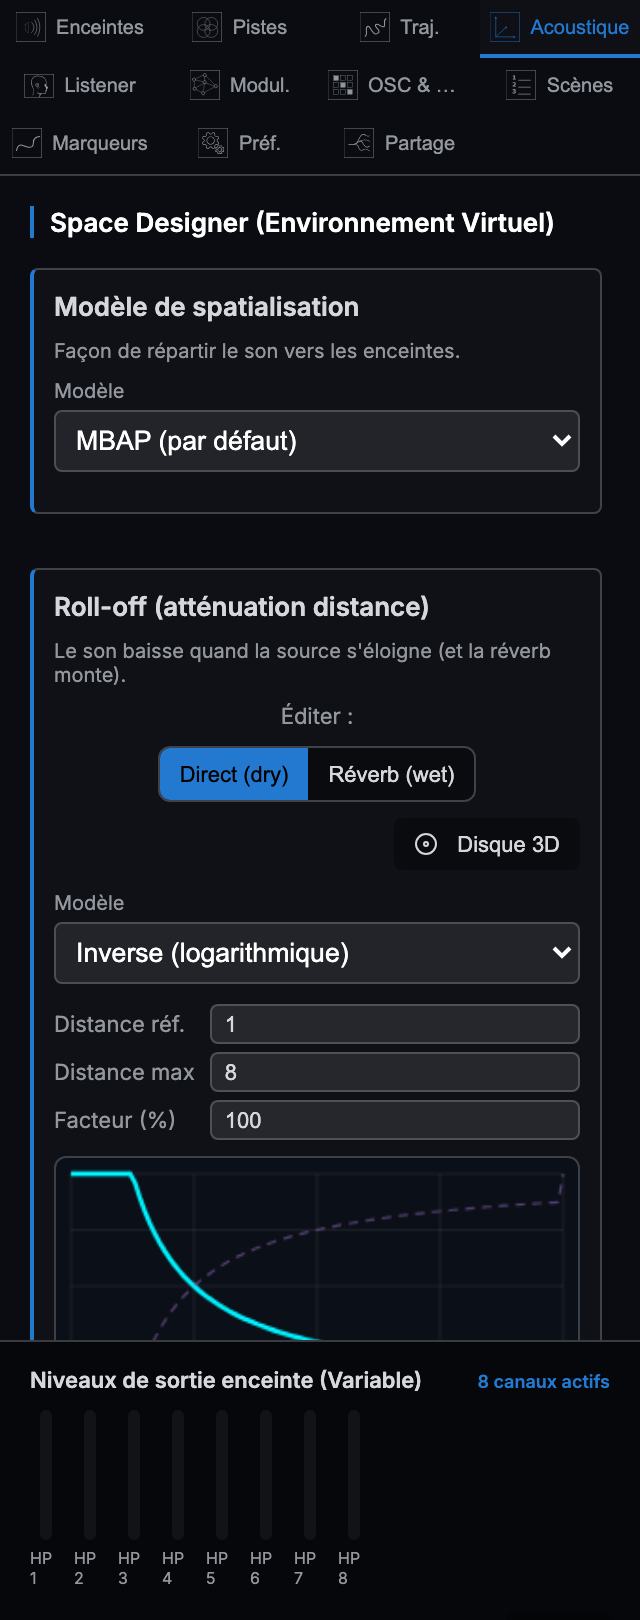
- MBAP (default) — the most robust, whatever the setup, including when a source passes inside the speaker volume.
- VBAP — a sharper image, carried by the speakers closest to the direction; the spread widens the image.
- WFS — adds delays between speakers to recreate the wavefront of a source: interesting on large, regular setups.
Roll-off (attenuation with distance)
The direct sound gets quieter as the source moves away, and the reverberation send can rise — two independent curves, edited via the Direct (dry) and Réverb (wet) tabs:
- Models — None, Inverse (logarithmic), Inverse square, Linear, or Custom: drag the points directly on the curve.
- Parameters — reference distance, max distance, factor (%).
- 3D disc — shows a gradient disc around the listener in the scene, reflecting the active curve.
Doppler & propagation
The Doppler effect simulates propagation delays: a fast-moving source shifts in pitch, as in real life. Settings: on/off, intensity (0–200 %), speed of sound (50–1500 m/s — slow it down to exaggerate the effect), space dimensions (m) and air attenuation (dB/m). The rendering is smooth, with no clicks.
Convolution reverberation
- Global reverb — the on/off switch, the space type (11 impulse responses: Glass dome, Hall, Chamber, Room, Cathedral, Dry studio, Short ambience, Plate, Spring, Shimmer, Liquid), the decay (0.5–15 s) and the dry/wet mix.
- Your own impulse response — import a WAV impulse response (48 kHz recommended); Remove returns to the built-in impulses.
- Send reverbs R1–R4 — four extra slots fed by the mixing desk sends (see §9). Each slot picks its preset, its decay, its return level, and above all where its return joins the signal: Fixed (in the room) — the reverberation is localized in the room and does not turn with your head — or Follows (the listener) — locked to the head, like a classic headphone reverb.
9. Mixing desk, groups & effects
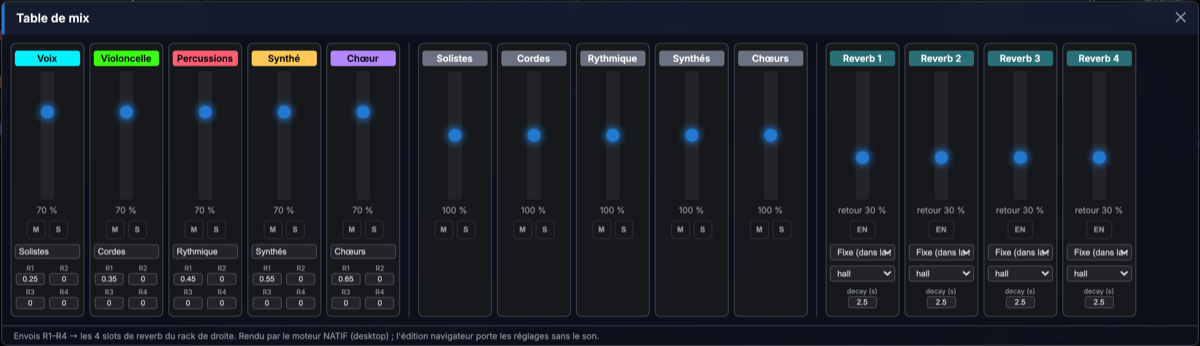
The mixing desk (faders button in the track bin) is the project's console:
- Track strips — fader with a multichannel meter hugging the fader, mute/solo, a group field (type a name: the group is created on the fly), effect slots, and 4 rotary sends R1–R4 (vertical drag, wheel, double-click = 0).
- Group strips — fader, mute/solo and sends per group. Effective gain = track × group; a track is silent if it or its group is muted; solo composes the same way.
- FX slots — 4 inserts per track or group: EQ, Compressor, Delay, Trim — plus your VST3 / AU plug-ins desktop (plug-in scan in the Preferences; each plug-in gets input/output matrices). The ≡ handle reorders the chain by drag and drop; ✎ opens the editor.
- Reverb rack — on the right: the mix's global reverb, then the send slots revealed by « + Ajouter une reverb » (add a reverb, R1 to R4). Each slot: EN (enable), return, Fixed / Follows, preset and decay. A slot stays visible as long as it is active or a track sends to it.
- Comfort — strip width adjustable globally (wheel over the header) and per strip (handle on the right edge).
At the bottom of the right panel, the speaker output levels show one meter per output channel — the signal actually sent to each speaker.
10. Sequencer: clips & editing
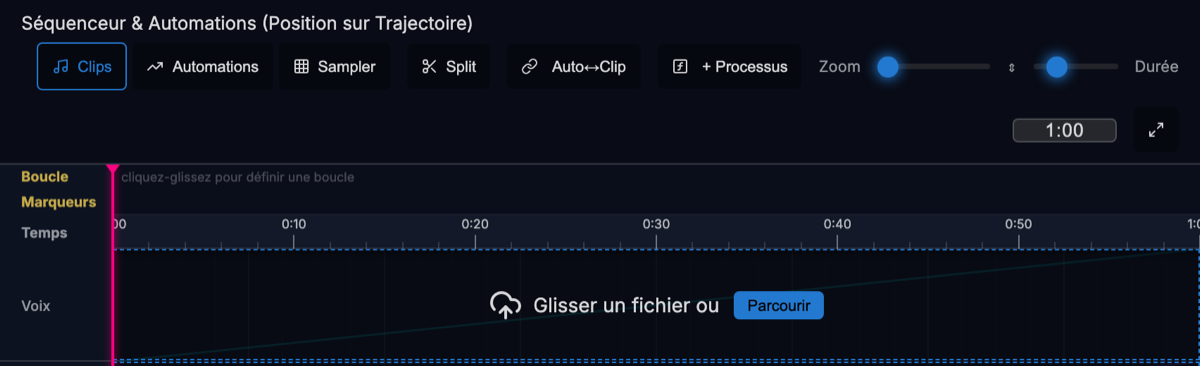
The timeline edits the audio: each track holds clips, slices of a source file placed in time. The toolbar is deliberately bare — icons only: Sampler, scissors (Split), link (Auto↔Clip), ƒ (+ Process), ♪ (+ MIDI), then the zooms and the project duration.
Automation, track by track
There is no global “Automations” mode any more: each track carries its own curves.
- ▾ <curve> in the track header picks the curve displayed on that track, creates one for any automatable parameter, and deletes the displayed one (the trajectory progress curve always exists).
- The ⇕ button expands the track into one sub-lane per curve, DAW style: each has its name, its “active” checkbox, and edits directly — click to add a point, drag to move it, double-click or right-click to delete it.
- Move a clip: drag its body (vertically: change track).
- Trim: drag its left/right edges.
- Fades: triangular handles (in/out); five shapes (constant power, linear, exponential, logarithmic, S-curve).
- Automatic crossfade: two overlapping clips on the same track create a constant-power crossfade.
- Split: scissors button or S — splits the clip at the playhead. Process clips can be resized from both edges.
- Multiple selection: Shift/Ctrl+click; deleting and moving act on the selection. Ctrl/Cmd+C / V copies/pastes at the edit cursor.
- Zoom: horizontal and vertical sliders (track height), or Ctrl/Cmd+wheel centered on the pointer. Duration: the h:mm:ss field sets the project length. ⤢: full-screen timeline.
The clip editor (double-click)
Double-click an audio clip to open its editor:
- Gain and fades — precise values, fade shapes.
- Per-clip position automation — the clip's own position-on-trajectory curve (see §11).
- Destructive processing with local undo — normalize, reverse, apply gain, apply fades. Each process isolates the clip (a new buffer: sibling clips sharing the same source are never touched) and can be undone with the editor's own undo.
Generative clips (+ Processus)
« + Processus » places a clip that plays no audio: for its duration, it runs a modulation patch (Inputs → Processing → Outputs slots, see §13) — for example an LFO sweeping a source's position between two time markers.
Two cursors
- Playhead (magenta) — sample-synchronized; it evaluates the automations at all times, even while stopped: move it to "scrub" through the movements.
- Edit cursor (dashed cyan) — placed with a click; it is the paste target.
Tempo, bars & time signature
The ♩ button in the transport bar shows the effective tempo and opens the Tempo panel. The idea fits in one sentence: tempo and playback speed are the same quantity read in two units — bpm = speed × reference.
- Dominant mode — Time: the SPEED slider is in charge, the tempo map is a display. Tempo: the map drives the speed during playback, the slider follows.
- Tempo map — steps, as in a MIDI file: click = add, drag = move, right-click = delete. Import from a .mid reads the file's tempo changes.
- Time signature — the bar grid (4/4, 3/4, 6/8…), saved with the session.
- Ruler in bars — when Tempo mode dominates, the timeline ruler and the clip editors' rulers speak in bar numbers (beats and subdivisions as you zoom); in Time mode they stay in seconds.
- Musical snap in the piano-roll — bar / beat / ½ / ¼: the grid is the project's; a clip that starts off-grid keeps it, offset. A newly placed note lasts one grid cell.
11. Automation
The timeline's Automations mode overlays curves that drive parameters over time. The default curve is the position on trajectory (0 → 100 %).
Multiple curves
The toolbar (visible in Automations mode) manages the lanes:
- Curve — selects the curve being edited; the active checkbox switches it on/off.
- + Curve — creates a curve towards the destination of your choice (volume,
spread, self-rotation
src.spin, continuous parameters…). Mute and solo are deliberately not automatable.
Drawing
- Click: add a node · drag: move it · clean click: delete it. Thousands of points are possible; zoom in for precision.
- Right-click on a node: cycles the interpolation of the segment to its right — linear → spline (S) → exponential → logarithmic. For expo/log, Alt+drag sets the tension.
Per-clip automation
Two scopes, your choice (Preferences → automation scope):
- Track — the curve belongs to the track; the Auto↔Clip button links/unlinks automations to clips (moving a clip takes its automation along).
- Clip — the curve is attached to the clip and always follows it. Each audio clip can carry its own position-on-trajectory curve (edited in the clip editor): moving or duplicating the clip moves the spatial movement with it.
Precision and smoothing
- Time grain (Preferences) — the automation evaluation step, from sample accurate to 500 ms.
- Gain smoothing — Sample (the smoothest, click-free), Block (~128 samples, lighter), None (stairsteps); glide time 3–50 ms.
12. Sampler
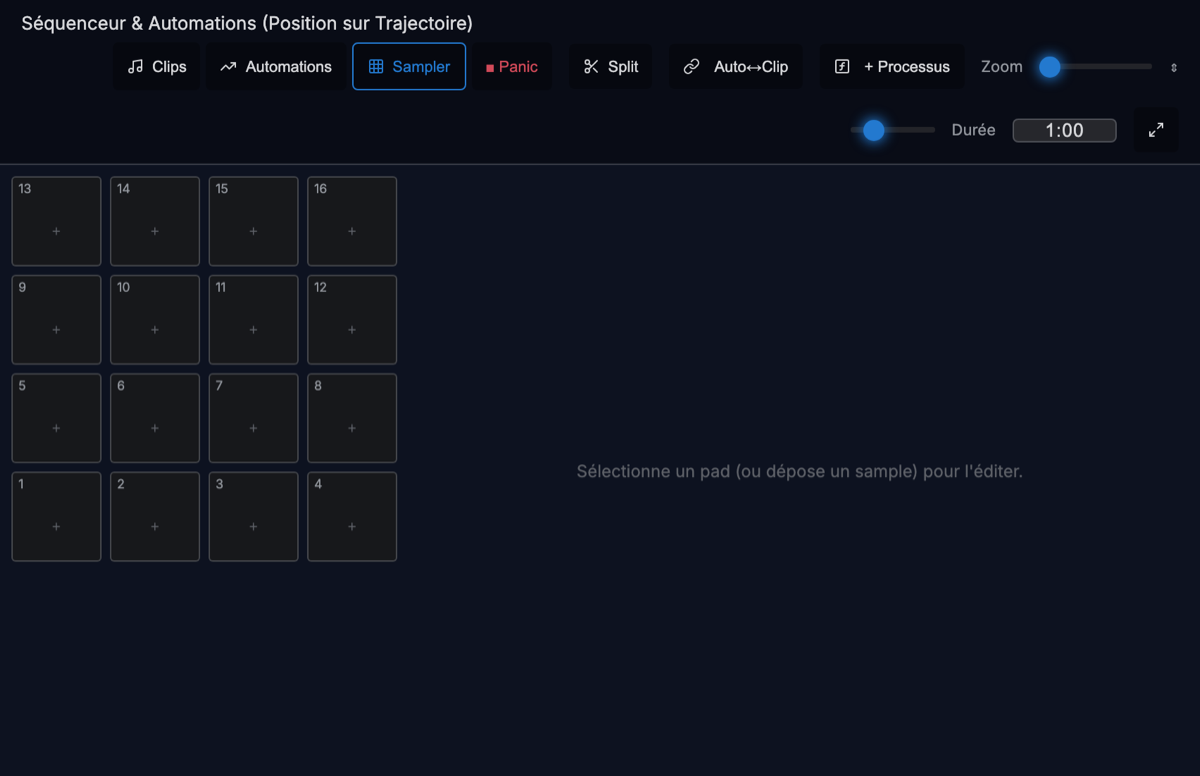
The Sampler button turns the timeline into a grid of 16 pads. Each pad is a
hidden track: it gets spatialization and trajectories, but lives outside the timeline and only
sounds when triggered (click, MIDI note, OSC /sampler/trigger).
- Assign — drag a file onto a pad; a whole folder distributes itself (« Distribuer »: one sample per pad, also reachable from a script).
- Multisample — a pad can hold several samples; playback mode order / random / keymap (the incoming MIDI note picks the sample: root note and low/high bounds per sample, MPC layout by default — pad i = note 36+i).
- Voices — mono (retrigger cuts) or poly (hits stack up, maximum polyphony set in the Preferences, 1–128 voices).
- Per-pad settings — boost (−12 to +24 dB), attack/release fades, pitch and stretch ranges, MIDI channel.
- Trajectory per hit — fix (fixed position on the trajectory) or random (each hit draws a trajectory position from the min–max bank): a polyphonic pad scatters its voices through space.
- ■ Panic — cuts all playing samples. Always visible in Sampler mode, assignable to a
MIDI note or CC (learn) and reachable over OSC (
/sampler/panic).
13. Modulators & the node editor
The Modul. tab manages per-track modulation slots. Each slot is one action: Inputs → Processing → Outputs.
- Inputs — signal analyses (level, spectrum…), LFO, MIDI (CC, pitch bend), existing parameters.
- Outputs — any continuous parameter: position on trajectory, spread, rotation, reverb mix… (several outputs possible).
- ✎ edit — opens the three-zone editor, and the node editor: a canvas with cables (wheel or the header zoom slider, drag the background = pan, double-click = recenter, nested sub-slots), with patch presets saved as JSON. The side columns only show the inputs and outputs that are active: “+ entrée” and “+ sortie” open the full catalogue, ✕ removes a connection. Dragging a node's right port onto “+ sortie” opens the destination picker. A palette bar at the top of the canvas groups everything you can add by category — internal parameters, MIDI, Audio — each icon opening its list.
- Notable inputs — MIDI-in (raw) reads the external MIDI port as is (pitch, velocity or gate of the last note, one channel or all); OSC (in) listens to an address; Audio trigger and Envelope follower analyse the track signal.
- Process-clip outputs — MIDI-out · notes (virtual MIDI port, with the generator module and its chain), MIDI-out · CC, Audio-out to the track (full path: inserts, sends, spatialisation), to a direct out (spatialised to the speakers, bypassing the track chain) or to a group bus, and OSC to an address. The palette's Audio category also hosts the clip's VST instrument and opens the track's VST plugin rack.
- Parameters — the button lists every available source and destination.
The same patches run on the timeline through process clips (§10): the patch only runs for the duration of the clip.
MIDI and OSC output to Max, Live and others
A process clip sends its signal outwards through its outputs: OSC (any address) and MIDI CC (channel + controller, on the « Sound Trajectory 4 » virtual MIDI port). A VST/AU instrument can also be hosted in the clip: the patch drives it (pitch = frequency of the « Audio » output, amplitude = level).
Removed in July 2026: note generators (arpeggiator, delay, echo, mirror), MIDI effects, the piano roll and the internal FM synth. Sound Trajectory focuses on spatialisation and on its coupling with the tools that already do that job — Max, Live, and your VST instruments. A session saved with those features still opens; the affected slots simply produce nothing.
14. Exports
All file input/output lives behind the Import / Export button in the top bar (on desktop, also in the system menu bar): open a session, WAV export, ADM and the Video panel.
The Export panel (WAV)
The Export button renders the timeline offline (clips, fades, spatialization, Doppler, reverberation — identical to playback) and writes one or more WAV files:
- Session speaker config — multichannel WAV, one channel per speaker.
- Binaural HRTF — 2 channels, headphones.
- Stereo mixdown — 2 channels.
- Atmos beds — 7.1.2 (10 ch) and 7.1.4 (12 ch).
- Ambisonics AmbiX — ACN/SN3D, order 1 to 7.
- ADM — objects + reverberation bed (see below).
- Session ZIP — session.json + audio files.
- Range — the whole project, or the selection between the loop markers.
ADM export (objects)
The ADM button writes an object-oriented WAV in the ADM format (BW64): each track becomes an object carrying its trajectory as position metadata, plus a reverberation bed. The file re-imports into ADM-compatible tools — and into ST4 itself (Import).
Video & MP4 export
The Video panel (marked "in development") loads a movie that follows the transport (play, pause, scrub) so you can compose to picture — the file stays local, only its name is remembered. Export MP4 muxes the video with the spatialized mix in binaural or 5.1 (the AAC encoder tops out at 6 channels: for 7.1.4/Atmos, use the multichannel WAV exports).
Sessions
- Save — the complete session, audio included: a standalone JSON for small projects, a ZIP (session.json + WAV) for large ones. On desktop, the native project archive (project.json + audio/) is written through the system dialog.
- Import — JSON/ZIP sessions, ADM files, audio files. The start screen lists the recent sessions.
15. Scripts
The Script menu macOS menu bar on desktop (top-bar buttons on web) opens the editor of a small French-language scripting language, made for batch operations. Safe by construction: a script can only act through the provided commands, touches nothing else, and always terminates.
# Distribute a folder of samples: one sample per pad.
soit fichiers dans choisir_dossier()
pour f dans fichiers
    soit i dans longueur(pads())
    pad_ajouter(i, f)
    pad_nom(i, f.nom)
appliquer()- Three views of the same program — text, cards and cables (node editor): all three show the same script, and you can switch between them without losing anything.
- Keywords —
soit(let),pour … dans …(for … in …),si/sinon(if/else),vrai/faux/rien(true/false/nothing),et/ou/non(and/or/not). - Primitives — files (
choisir_dossier,choisir_fichiers), sampler (pads,pad_ajouter,distribuer…), transport (jouer,aller_a,bpm…), tracks (piste_creer,piste_charger,piste_trajectoire…), and the catch-allsparam(path, value)/osc(…)which reach any parameter. - Distribuer — the top-bar shortcut applies the "one sample per pad" script to a folder of your choice.
16. iPhone / iPad controller desktop
The phone button (top bar) starts a small server on your local network and shows a QR code:
- Make sure the phone is on the same Wi-Fi network as the computer.
- Scan the QR code with the camera — the control page opens in the phone's browser (nothing to install).
- Control: source positions, continuous parameters, pad triggering — live, with the same authority as the mouse. The number of connected clients is shown in the dialog.
17. OSC & MIDI
ADM-OSC
The OSC & MIDI tab connects ST4 to a console or an external program speaking
ADM-OSC, in both directions. On desktop, the application talks UDP directly
(commands: port 9000; outgoing ADM stream 9100, incoming 9101). On web, a browser cannot speak
UDP: first start the small bundled relay (osc_udp_relay.mjs — the steps are shown in
the tab itself).
| Address | Args | Effect |
|---|---|---|
/adm/obj/<n>/x|y|z | f | Position of object n per axis (−1…1) — sent and received. |
/adm/obj/<n>/xyz · /aed | fff | Cartesian / polar position (azimuth, elevation, distance). |
/adm/obj/<n>/gain · /mute · /w | f/i/f | Linear gain, mute, width (spread). |
/listener/position/xyz · /adm/lis/xyz | fff | Listener position. |
/listener/track · /listener/index | i · f | Track the listener rides, and its 0–100 % position on the trajectory. |
/<n>/index | f | Position of track n on its trajectory (0–100 %). |
/<n>/coord/{xyz|x|y|z|aed} | f… | Direct coordinates of track n. |
/<n>/path|group/rotate|scale | f | Rotation / scale of the trajectory or group. |
/select · /cue/index | i | Active track · jump to a cue. |
/sampler/trigger · /sampler/note · /sampler/panic | i… | Pad triggering · note · panic. |
The OSC monitor logs incoming/outgoing messages; send everything (snapshot) emits the position and gain of every object; OSC parameters shows the full table.
MIDI
- Enable MIDI — opens the inputs/outputs; pick the device.
- MIDI Learn — enable Learn mode, click a control in the interface, move a knob: the CC is bound. The mapping list is edited below, and persists between sessions.
- Notes — notes play the sampler pads (per-pad keymap).
- Panic — assignable to a note or a CC by learning.
18. Snapshots, markers & cues
Snapshots
A snapshot stores the whole spatial state: source positions and geometries,
trajectories, listener, speakers, effects. Capture creates one, ▶ recalls it instantly,
Update replaces the content of the selected snapshot. Recall over OSC:
/cue/index.
Zone loop
Loop a zone loops between Start and End (the ⤓ buttons set a bound at the playhead). The zone is highlighted on the ruler; it takes priority over the global loop. The timeline's Loop lane can also be created by click-dragging, with punch-in/punch-out handles.
Cues (time markers)
Add a cue at the playhead drops a named marker. On the timeline: double-click on the "Markers" lane adds/removes a cue, a click on a flag moves playback there, a drag moves it. The list in the tab edits name and time.
19. Preferences
| Setting | Description |
|---|---|
| Audio driver desktop | Device, buffer size and sample rate (system dialog). |
| Audio output web | The browser's output device; in Direct mode, one channel per speaker. |
| Sampler polyphony | Maximum voices of a poly pad (1–128). |
| inPlace visualization | Particules (size, intensity) and Polaire (scale, opacity). |
| Theme | Pro (sober default), Cyan neon, Amethyst, Emerald, Amber, Pink, Slate, and Negative/full-sun (white background). |
| Language | FR, EN, ES, DE, IT, PT, RU, ZH, JA. |
| Reference duration | Project length (default 10 min). |
| VST3/AU plug-ins desktop | Scan at startup (optional), custom scan folders. |
| Decimal precision | Decimals shown in the editors (1–6). |
| Automation scope | Track (movable via Auto↔Clip) or attached to the clip. |
| Latency / buffer | 64 to 2048 samples — larger = more stable, more latency. On desktop, the value follows the audio driver setting. |
| Timestretch quality | Low / Medium / High, plus automatic audio adaptation, which temporarily lowers the quality under heavy load to avoid dropouts. |
| Time grain | Automation evaluation step: sample accurate → 500 ms. |
| Smoothing | Gain interpolation (sample / block / none) and glide time (3–50 ms). |
| AudioWorklet audio engine web | Processes the audio on a dedicated browser thread: more stable, recommended. |
20. Sharing & collaboration web
- Online storage — encodes the samples as 256 kb/s MP3 for lighter sessions to share. By default, nothing is sent online. In development.
- Shared session (collaborative) — connect to a session server, pick a room (or create one): several people edit the same project in real time and see each other's presence. The start screen lists the server's shared sessions and lets you join one with a click.
- Online account — the profile button (top bar) manages the sessions, versions and shares linked to your TripinLab account.
21. Keyboard shortcuts
| Shortcut | Action |
|---|---|
| Space | Play / stop |
| S | Split the clip at the playhead |
| Del / Backspace | Delete the selected clip(s) or point(s) |
| Double-click (3D scene) | Add a trajectory point |
| Shift+click (3D scene) | Delete a trajectory point |
| Alt+drag (3D scene) | Set the height (Z) |
| Ctrl/Cmd+C / V | Copy / paste (timeline clips, trajectory points) |
| Ctrl/Cmd+wheel | Timeline zoom centered on the pointer |
| Right-click (automation node) | Cycle the segment interpolation (linear → S → expo → log) |
| Alt+drag (expo/log node) | Set the curve tension |
| Double-click (audio clip) | Open the clip editor |
| Double-click (Markers lane) | Add / remove a cue |
| Esc | Leave full screen (3D or timeline), close windows |
| → / ← (guided tour) | Next / previous step |
22. Troubleshooting
No sound
On web: click inside the page first (the browser's autoplay policy). Check the master volume, that no solo is left on somewhere (mixing desk), and that a clip actually sits under the playhead. In Direct output, check the selected device (Preferences) and its channel count. On desktop, check the device in « Réglages audio… » (audio settings).
Clicks / crackles
Raise the latency (Preferences, 512 or more), keep the Sample smoothing, enable automatic audio adaptation. The load shows in the DSP bar; High-quality timestretch is the most expensive.
The speed changes the pitch (or the opposite)
That's the selector next to the speed: Pitch (resample) changes the pitch, Timestretch preserves it.
Sources seem stuck at the edge of the speaker setup
That's the frame of amplitude panning: set up the roll-off (Acoustics tab) so the source keeps attenuating as it moves away, with no distance limit.
The multi-import didn't overwrite anything, but my files aren't where I want them
That's by design: multi-file distribution never overwrites an occupied track. Choose the Défilé (cascade) mode and select the starting track first.
The timeline (or the 3D scene) has disappeared
You are in full screen: Esc always restores the layout.
The controller QR code doesn't work
The phone must be on the same local network as the computer; corporate networks sometimes isolate Wi-Fi clients. The feature only exists on desktop.
A session doesn't recall its audio
Load the .json or .zip saved by the application (the audio is embedded in it). For a large project, prefer the ZIP save.
The guided tour skips steps
That's normal: steps whose element doesn't exist in your edition (web/desktop) are skipped automatically.
23. FAQ
How many speakers, tracks, channels?
Up to 64 speakers. Tracks are unlimited (CPU load is the practical limit); a track carries up to 144 channels on desktop (32 in the browser). AmbiX decodes up to order 11 on desktop (4 on web).
Does my data go online?
No — everything works locally. Only the explicitly online features (account, storage, shared session) send data, and they are off by default.
What's the difference between the global reverb and the R1–R4 reverbs?
The global one processes the whole mix (Acoustics panel). R1–R4 are send reverbs, dosed track by track in the mixing desk, each of which can be fixed in the room or follow the listener.
Can I use ST4 with my DAW?
Yes: through the STtracks plug-in (input type STbridge — the DAW's audio arrives in the tracks in real time), through ADM-OSC (positions), through the ADM export (file exchange), or by routing the multichannel export.
Automating mute/solo?
No, by design: they are safety mixing gestures. Everything else (positions, gains, spread, spin, sends…) is automatable and controllable over OSC/MIDI.
Going further
The theoretical details deliberately left out of this manual — spatialization models, ambisonic and ADM formats, roll-off curves — are gathered in the technical appendix (version française).